A Beginner's Guide to
Particle Rain in Maya
by Alan Fregtman & Erik
Tryggvason, 11/20/2007
In this tutorial, we'll outline how to create simple rain using Maya's
particles system. Read on.
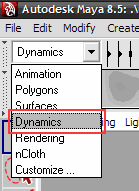
Before we begin to even use particles, we'll need to be in Maya's
Dynamics module.
This will reveal the Particles menu.
[We won't be using the Dynamics shelf because it can be accidentally modified
or
destroyed, whereas menus are always there and have concise names.]
1. Creating The Emitter
First, we'll need an emitter. Rain comes from high above from random locations
over a general area. To achieve this effect, we'll need to emit from an
object.
Create a surface to emit from. We can use any object, but for
simplicity, we'll use a plane:
Create->Polygon Primitives->Plane
- let's turn the subdivisions down to,
say, 2 in each direction.
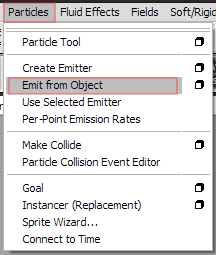
With the plane object selected, go to: Particles->Emit from
Object
Create the emitter first, then we'll adjust its options in the channel
box.
This will make our grid emit particles in every direction.
You'll notice that just clicking emit from surface causes particles to emit
from the vertices of the grid. That's because our emitter is an omni
emitter if we don't specify any options.
All of our options, and some more, will be in the emitter attributes page.
2. Emitter Settings
There should be tabs labelled particle#, particleShape#, and
emitter#, where # will depend on however many emitters are in your
scene.
particle# is your particles object (the actual particles),
particleShape# dictates their appearance, and
emitter# is where particles originate.

Other tabs are probably going to be lambert1, time1, and
initialParticleSE.
[We won't need to change anything in these, or particle1.]
Without setting options, our particles will continue to emit without
disappearing.
Eternal particles can be a problem as the more particles are in your scene,
the slower the computation will be.
We want our particles to live long enough to do their job.
Under the particleShape tab (in the Attribute Editor) we have a lot of
options.
A handy one right now is Lifespan Attributes.
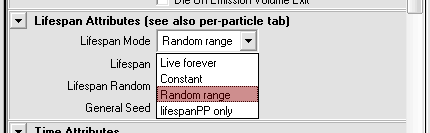
There are four different modes:
Live forever, Constant, Random range, and lifespanPP only.
Set the lifespan attributes to Random Range.
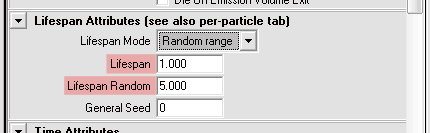
Here we've set our Lifespan to 1.000 and our Lifespan
Random to 5.000.
This means that our particles die off after 1 second, give or take a
random number
between 1 and 5.
This should make it look less robotic, more chaotic and thus more natural.
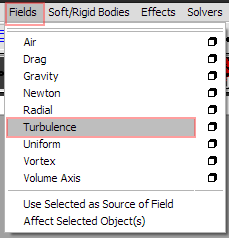
3. "Oh GRAVITY, I SUMMON THEE!! "
Right now, our particles are still flying in every direction. If we want
them to fall in a certain direction, we'll need to create Gravity.
In Maya terminology, forces are called "fields". All the fields are
available to us under the Fields menu.
Select your particles (not the emitter) as an object
and go to Field->Gravity

The particles should now be falling downwards.
(Default gravity is set to a value of 9.8, which is Earth-like. Don't touch it.)
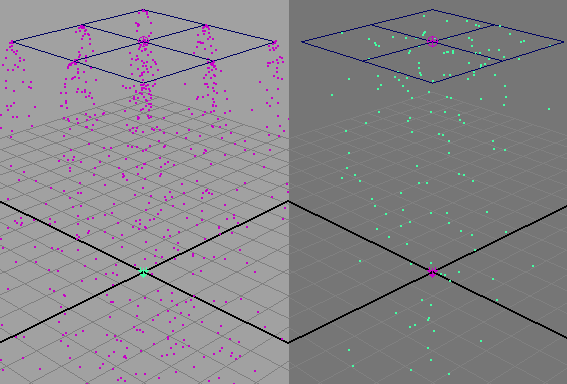
We haven't changed our emitter type yet, but it does
give us a good idea of how our particles are behaving right now.
[ TIP: If your particles are hard to see, you can
change the background color using Alt+B ]
LEFT: Particles emitting as Omni.
RIGHT: Particles
emitting as Surface, and BG changed.
4. Making the Particles Look A
Little Bit More Like Rain
To change the
look of our particles, we must play with the options
under
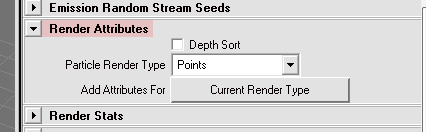
particleShape# » Render
Attributes.
There are a variety of display options. "(s/w)" means it will
render in software only, which we won't be using.
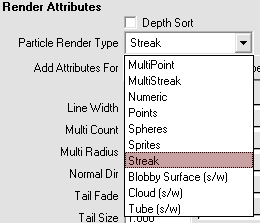
Let's
choose Streak.
Don't forget to click on the "
Current Render Type" button
(next to
Add Attributes For).
If you don't, you won't see attributes for modifying the look
of the current render type.
Now, our particles are still falling
directly downwards.
We can change this by using a
Turbulence field.
This will create irregularities in the motion of our particles, akin to noise
or jitter.
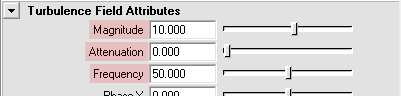 Magnitude
: will increase or decrease
the intensity of the field.
Attenuation: will affect
how the force diminishes over distance.
No attenuation means forces will remain constant.
Frequency: will let us change
how often there are
irregularities.
Unless it's really windy out, though, rain doesn't blow every which direction.
Let's
set our magnitude between 5.000 and 10.000, and the
frequency
to 50.000
This will give our particles a bit of chaos in their movement, but not too
much.
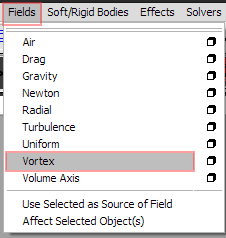
Unfortunately, while our particles have some more randomness to their
movement, they still fall for the most part directly downwards.
A vortex field can help here.
While
turbulence simulates disturbances in the air on a small scale by
itself, a
vortex field will pull our particles in a
circular direction.
This may not seem fitting, but it actually makes them look more believable if
the effect is gentle. (We're not looking for a tornado here.)
At high values, we can simulate tornadoes or whirlpools.
At smaller values, we'll be able to make our particles as a whole spin
slightly.
This will reduce the randomness of our rain somewhat, but it'll also produce a
more believable effect.
For the most part, it prevents our particles from looking like they're a
square column of rain.
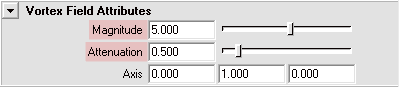
Let's
set the vortex magnitude to 5.000 and attenuation to 0.500 for
now.
Still, our particles will only be emitting from within the bounds of our
polyPlane.
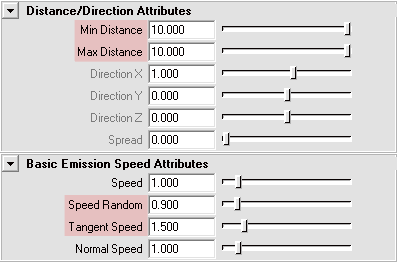
We can easily make them emit from around it by changing the
Min & Max
Distance values.
These options will be in the
Distance/Directions Attributes,
under the
emitter# tab in the channel box.
Basic Emission Speed Attributes will let us make our particles
behave even more random:
Values for
Speed,
Speed Random, and
Tangent Speed set
multipliers for the emission speed of our particles.
(ie 0.5 will reduce speed by half, while 2 will double
speed.)
While Speed will remain our main speed, Speed Random will define the range of
variation between particle speeds.
Tangent Speed and
Normal Speed will control the angle at which
particles are emitted from the surface.
Let's leave
Speed at 1.000, set
Speed
Random to 0.900 and
Tangent Speed to
1.500.
Now our particles emit from a much larger area around the original surface.
If your fields seem to be affecting the particles too strongly, now is a good
time to adjust them.
5.
Collisions
Now that our rain is falling and doesn't appear too mechanical,
we want it
to collide with something.
Create a new polyPlane large enough to see the particles colliding with
it.
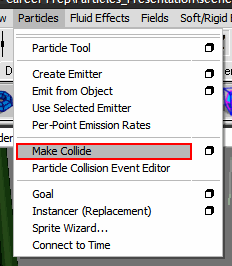
To make things collide:
1. Selecting your
particle# object
2. Then select the object we want to collide with
3. and then go to
Particles->Make Collide
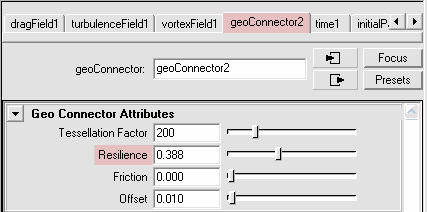
However, default values will make our particles bounce quite dramatically.
This bounciness is controlled by our resilience.
Resilience can be changed through the geoConnector
# tab in the
channels box.
Generally, a lower value will be better.
Now, while our rain is bouncing off the ground, it doesn't look very accurate
at this point,
because a raindrop should splash when it hits the ground, not bounce like a
ball.
We want our raindrops to split into 3 on collision with the ground. (Could be
more, but 3 seems like a good number.)
For this, we want to use the Particle Collision Event Editor,
which you can find in the Particles menu.
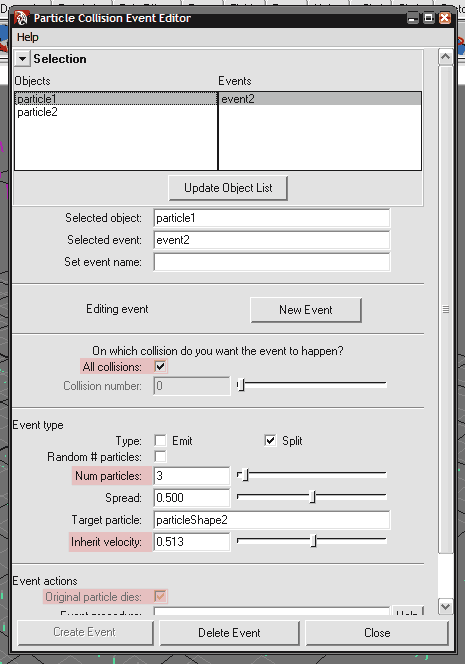
To create particles emitting when the rain collides with the ground, we need to
create a new event.
We want this to happen on all collisions, so we'll check the All Collisions
box.
We can either emit new particles on collision or split existing particles,
which will thus inherit velocity.
Now, while we have new particles emitting on collision, the new particles won't
be affected by gravity!
While you could make a new gravity field, it's best to re-use the existing one.
For this, you'll need to select the gravity field,
and shift+click to select the new particles,
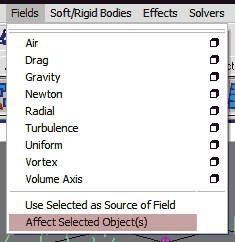
then go to Fields->Affect Selected Object(s)
(You can always use the Outliner if you have
difficulty selecting stuff in the viewport.)
If we want other fields to affect the new particles, we can do the same thing,
but we shouldn't need to use any of the other fields except for gravity for
the split particles.
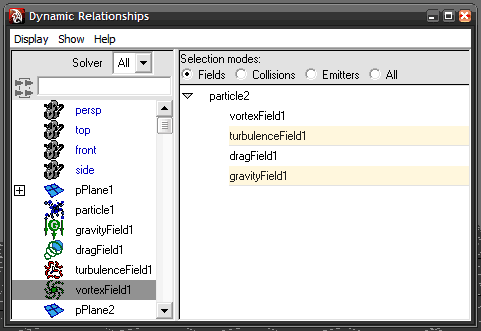
There's also Window -> Relationship Editors ->
Dynamics Relationship Editor
This can show which fields or events are affecting scene elements and make or
remove connections by simple clicking.
Select an item from the left pane,
and the right pane will show which dynamic fields are affecting it.
(Though the highlighting of connected events could be
better.
Blame Autodesk for choosing an invisible shade of yellowy
white. Augh!)
We'll adjust the look of the new particles in the next chapter.
6. Improving The Look
Now that our particles are behaving like rain, we want to make them look even
more like rain. We have a few options here:
- Render Attributes will let us set basic attributes such as particle
size and length.
- Using Per Particle attributes, we can specify opacity and rgb values
using ramps
- We can also instance geometry and use an appropriate shader.
For now, it will be much simpler to adjust settings through the Render and Per
Particle Attributes window.
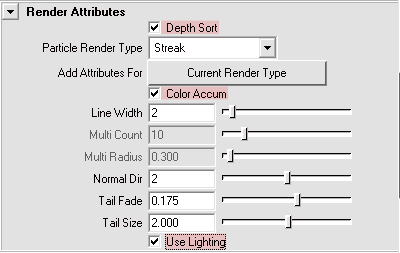
Our particles will not be lit with scene lighting if we do not enable
Use Lighting (at the bottom of the picture.)
However, they will not be shaded correctly for rain when lit and colored if we
don't enable Color Accum as well.
Color Accumulation will add all of the particle's color
together, making them bright white at the point of emission.
Enabling Depth Sort will force Maya to draw particles
furthest from the camera first.
(This isn't important for us right now, but should you want to render the
particles,
it would ensure that there were no overlapping colors or edges.)
Now, let's create some ramps that will control the particle opacity and
color. To do this, we'll need to add two attributes - Opacity, and
Color.

These buttons are in the Add Dynamic Attributes section,
right below the Per Particle (Array) Attributes section for
particleShape#.
When we click either of these buttons, another window will come up:
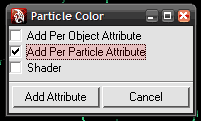
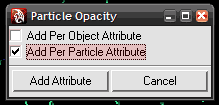
Since we want to add an attribute Per Particle, we want to check the
Add Per Particle Attribute.
The windows appear slightly different, but are otherwise identical.
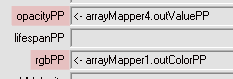
Now, your Per Particle (Array) Attributes Window should sport two new entries:
opacityPP & rgbPP
(PP = Per Particle)
Hold the right mouse button in these new properties and pick Create
Ramp.
This will create expressions in the two entries for opacity and color.
Hold the right mouse button again and this time we'll hit Edit
Ramp.
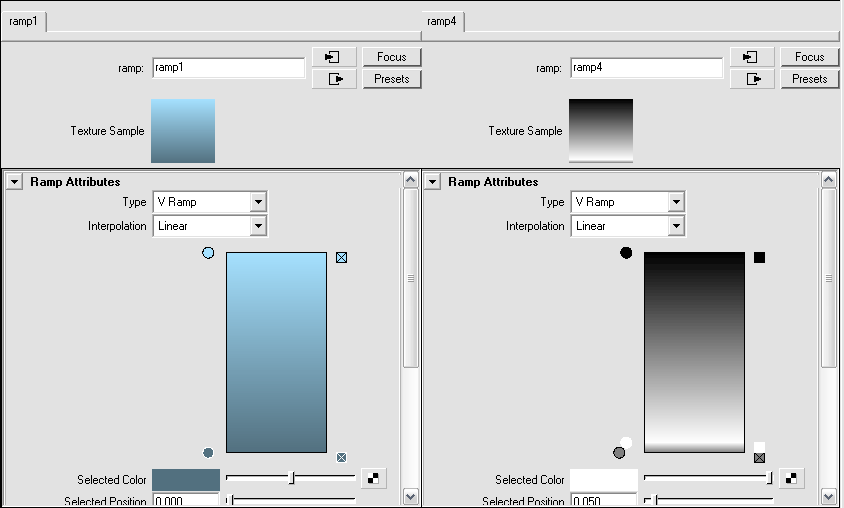
Ramps similar to the following should be fine. (We assume you have working
knowledge of how to adjust them. Ask a fellow classmate for help if you need
it.)
LEFT: The ramp controlling the rgbPP value.
RIGHT: The ramp
controlling the opacityPP value.
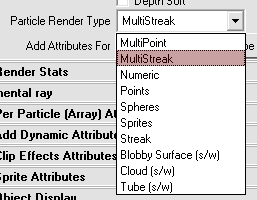
Last but not least, for the new particle# object (the one of the
collision particles),
you'll want to go to its render type and set it to MultiStreak.
This is good because it increases the complexity of the look without
bogging down its computation any more than any other type.
(Again, don't forget to click on the "Current Render Type" button
afterwards.)
It should now look very splashy.
If all goes well, then the particles should look, and act, to a degree, like
rain!
Thank you for taking the time to read this tutorial. We hope you learned
something along the way. :)